
Cursor AI Tutorial: 7 Proven Steps to Build Your First AI-Assisted Project

Why This Cursor AI Tutorial Skips the Feature List and Starts With a Real Project
Most guides to AI code editors read like spec sheets. They list autocomplete, chat, agent mode, and move on. That approach fails the exact person who needs it most: someone with no engineering background who wants to know if they can actually build something usable, not just read about it.
This Cursor AI tutorial is built differently. It walks through installing the editor, setting up a real folder, and shipping one working feature in a single sitting. Every step assumes you have never opened a terminal before this week. By the end, you will know exactly what Cursor can do for you right now, and what still requires patience, not talent.
The timing matters too. AI code editors stopped being a developer-only tool sometime in the last year, and the gap between “I could learn to code” and “I could just describe what I want” has narrowed enough that a non-engineer finishing this Cursor AI tutorial today will walk away with something real, not just a demo.
What Cursor AI Actually Is
This Cursor AI tutorial starts here, because you cannot describe what you want to a tool you do not understand yet. Cursor is a code editor built on top of the same foundation as Visual Studio Code, with AI woven into every layer instead of bolted on as a plugin.
Where a plain editor waits for you to type every line, Cursor predicts your next edit, rewrites selected code from a plain-language instruction, and can execute multi-step tasks across several files on its own.
The distinction that matters for a beginner is this: you are not learning to code from scratch. You are learning to describe what you want clearly enough that the AI can build it, and to recognize when the result is actually correct. That second skill, judgment, is the one this Cursor AI tutorial spends the most time on.
How This Differs From Just Asking ChatGPT to Write Code
This Cursor AI tutorial exists because that difference matters more than it sounds. A reasonable question at this point: why not just paste a request into ChatGPT and copy the code it returns? You can, and many beginners start there. The problem shows up on the second request.
ChatGPT in a browser tab has no access to your actual files. It cannot see what you already built, so every new request forces you to re-paste context, and every fix requires you to manually copy code back and forth.
Cursor sits inside your project instead. When you ask for a change, it already knows what files exist, what your last feature looked like, and where a new function needs to plug in. That shared context is what keeps a multi-step project coherent instead of falling apart into mismatched fragments.
What You Need Before You Start
Before you start this Cursor AI tutorial, know that you do not need programming experience. You do need three things:
- A laptop or desktop running Windows, macOS, or Linux, with a few gigabytes of free space.
- A free email address to create your Cursor account.
- One small idea for a project. Not an app idea you have been saving for years. Something small enough to finish today, like a personal expense tracker or a simple to-do list.
Skip the temptation to start with your real idea. First projects exist to teach you the workflow, not to ship a product.
A Quick Vocabulary Cheat Sheet for Terms This Cursor AI Tutorial Uses
A handful of words will come up repeatedly once you start using Cursor, and knowing them in advance saves you from feeling lost mid-project. Keep this Cursor AI tutorial open in another tab while you work through the list below.
- Prompt. The plain-language request you type into Chat or Agent mode. Specific prompts produce specific, checkable results; vague prompts produce vague ones.
- Diff. A side-by-side view of exactly what a change adds or removes, shown before Cursor applies it. Always glance at the diff before accepting, even if you cannot read every line yet.
- Terminal. A text-based window for running commands, built into Cursor under View then Terminal. You will mostly copy commands Cursor suggests rather than write your own.
- Repository (or “repo”). The project folder itself, along with everything inside it. Cursor reads the whole repo for context, which is why an empty, clearly named folder works best for a first project.
- Model. The specific AI system generating a response. Cursor lets you pick between several; for a beginner, the default selection is fine until you have a specific reason to change it.
Step 1: Download and Install Cursor
The first move in this Cursor AI tutorial is getting the editor onto your machine. Go to the official Cursor download page and choose the installer for your operating system. Cursor detects your platform automatically and downloads roughly 200 MB. Install it the same way you would install any other application, then open it.
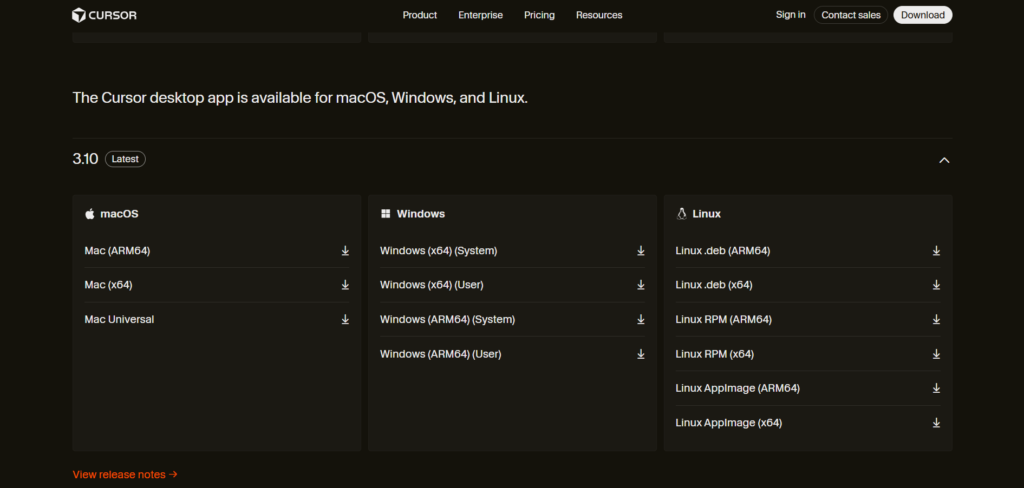
Do not download Cursor from anywhere except cursor.com. Cursor does not sell through resellers, and third-party installers are a security risk, not a shortcut.
Step 2: Create Your Account and Import Your Old Editor Settings
The second step in this Cursor AI tutorial is account setup, which takes under a minute. On first launch, Cursor asks you to sign up with an email address or an existing Google account. This takes under a minute and does not require a credit card for the free Hobby tier.
If you have ever used Visual Studio Code, Cursor will offer to import your settings, extensions, and keybindings. Accept this. If you have never used a code editor before, skip it and move on with the defaults.
Step 3: Learn the Three Ways You Talk to the AI
Step three of this Cursor AI tutorial is the one most beginners skip, and it costs them later. Before touching a project, spend ten minutes understanding the three interaction modes. Confusing them is the single biggest reason beginners feel lost in week one.
Tab: Predictive Autocomplete
As you type, Cursor’s Tab feature suggests the next few lines, and sometimes edits across multiple open files, based on the pattern of what you are already writing. Press Tab to accept, keep typing to ignore it. You use this passively; it does not require a request.
Cmd+K (Ctrl+K on Windows): Inline Edits
Highlight a block of code, press Cmd+K, and type an instruction such as “add error handling here” or “make this section mobile-friendly.” Cursor rewrites only the highlighted section and shows you the change before applying it.
Chat and Agent Mode: Full Tasks
Press Cmd+L to open the chat panel. This is where you describe a feature in plain language and let Cursor plan and write it. Agent mode extends this further: it can create files, run terminal commands, and fix its own errors across an entire project without you approving every single line, though you still review the final diff before it is saved.
Step 4: Open or Create Your First Project Folder
With the basics covered, this Cursor AI tutorial moves into your actual project. Use File then Open Folder, and either point Cursor at an empty folder you just created or drag one onto the window. An empty folder is the right choice for your first project. There is nothing to accidentally break.
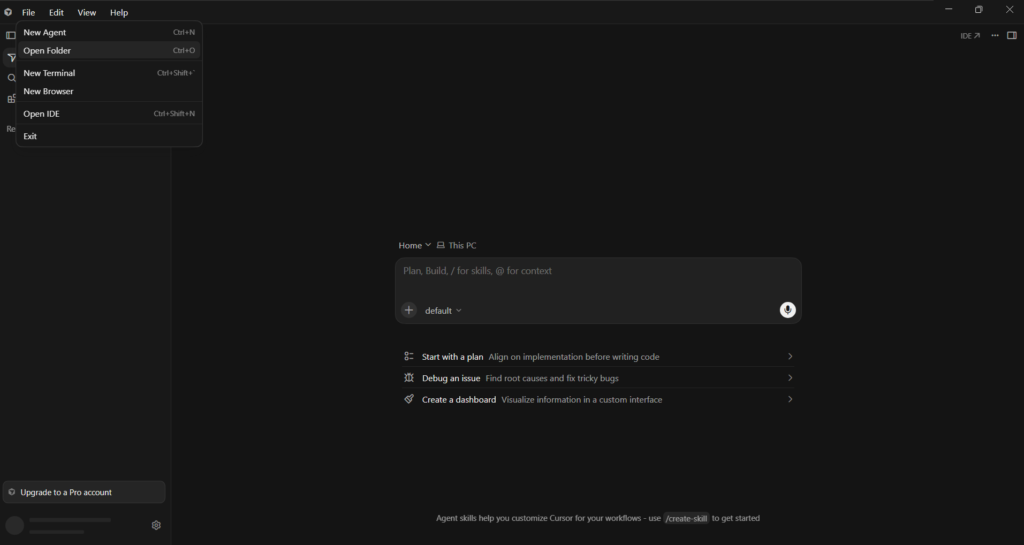
Name the folder something specific to your project, not “test” or “new folder.” Cursor uses folder and file context to understand what you are building, so a clear name helps the AI make better assumptions from the first prompt.
Step 5: Use Chat to Scaffold a Real Beginner Project
Open the chat panel and describe your project in one or two sentences. For a personal expense tracker, a reasonable first prompt looks like this: “Build a simple web page where I can add an expense with a name and amount, and see a running total. Use plain HTML, CSS, and JavaScript, no frameworks.”
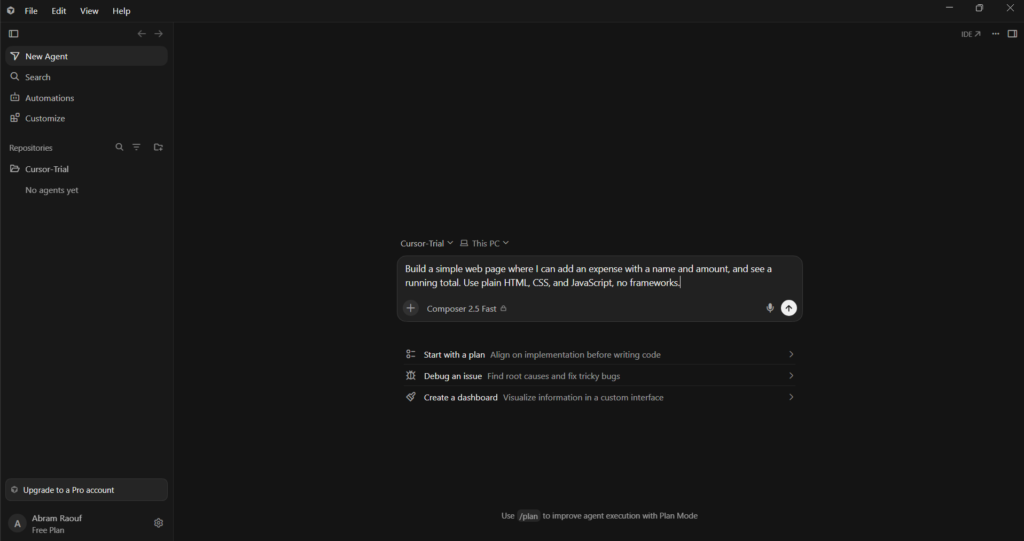
Cursor will typically respond with a short plan, something like: create an HTML file for structure, a CSS file for layout, and a JavaScript file to handle adding expenses and updating the total. It then creates the files directly, or suggests a terminal command to scaffold them.
Run any suggested command in the built-in terminal (View then Terminal) rather than typing the files by hand. Open the resulting HTML file in your browser immediately. You should see a basic form and an empty total.
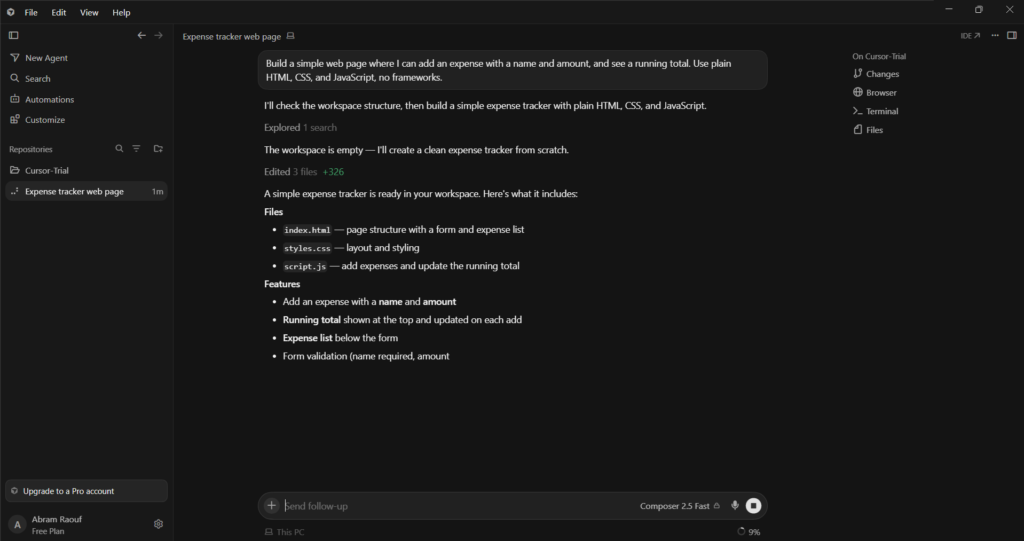
That small, working result, before you have written a single line yourself, is the point where most non-engineers realize the barrier was never syntax. It was never knowing where to start, and the AI just answered that question for you.
Step 6: Use Agent Mode to Build One Complete Feature
This Cursor AI tutorial now moves from scaffolding to a real feature. Once the basic page exists, switch to Agent mode and ask for one additional feature, such as “let me delete an expense from the list and update the total automatically.” Keep the request specific and singular. Agent mode performs best on one clear task at a time, not a bundle of five vague requests.
Watch what it does. Agent mode will open files, write code, and may run the project to check its own output. This transparency is intentional. It is also your best training ground for the next step, which is the one beginners skip.
Step 7: Review, Run, and Fix What Breaks
The final step in this Cursor AI tutorial is the one that determines whether any of the rest sticks. Open your project in a browser or run it from the terminal after every change. Do not stack five AI requests on top of each other without checking the result in between. If something breaks, copy the exact error message into chat and ask Cursor to explain and fix it.
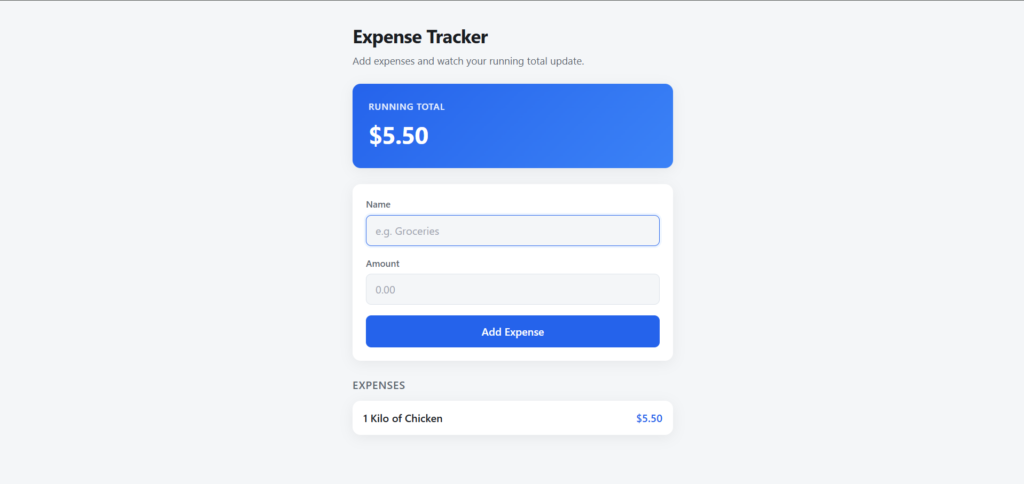
This step is where a non-engineer starts to build real capability. You are not writing the fix yourself. You are learning to notice when something is wrong, which is a skill no AI tool replaces for you.
The Mistakes That Stall Most Beginners in Week One
Every mistake in this Cursor AI tutorial shows up repeatedly in beginner projects, and each one is easy to avoid once you know to look for it.
- Starting with a complex idea. A project with user accounts, payments, and a database on day one guarantees frustration. Start smaller than feels necessary.
- Never running the project. Code that looks correct and code that works are different things. Run it after every meaningful change.
- Vague prompts. “Make it better” produces vague results. “Add validation so the amount field rejects negative numbers” produces a specific, checkable outcome.
- Stacking Agent requests. Asking for three features in one message makes it harder to tell which change caused a new bug.
- Ignoring error messages. The error text is not noise. It is the fastest way to get a correct fix from the AI.
Free vs Paid: Which Cursor Plan Actually Fits a Beginner
This Cursor AI tutorial assumes you will start on the free tier. Cursor’s Hobby tier is free and sufficient for a beginner testing this workflow for the first time. You will hit its limits once you start using the AI daily, at which point the Pro tier is the natural next step.
| Plan | Monthly Cost | Best For |
|---|---|---|
| Hobby | Free | Learning the workflow, occasional small projects, limited Agent requests and Tab completions |
| Pro | Around $20/month (roughly $16/month billed annually) | Daily use, extended Agent limits, access to frontier models |
| Pro+ / Ultra | Higher usage-based tiers above Pro | Heavy daily agent users who exceed Pro’s included usage |
| Teams | From $32/user/month | Small teams that need centralized billing and shared context |
Pricing and included usage change often, so confirm current numbers on Cursor’s official pricing page before committing to a paid tier. For a first project, stay on Hobby until you know you will keep using the tool past this week.
What a Non-Engineer Can Realistically Build With Cursor
This Cursor AI tutorial has covered installation and workflow. The question that actually matters now is what you can build with it.
Be honest with yourself about the ceiling here. A beginner using Cursor can realistically build: a personal tool that solves one specific problem, a simple internal dashboard for tracking a team’s tasks, a static portfolio or small business website, a habit or budget tracker like the one in this Cursor AI tutorial, a small automation script that renames files or reformats a spreadsheet, or a working prototype to test an idea before hiring a developer.
What a beginner should not expect to build without real learning: a production application handling real user data and payments, anything requiring security review, or a complex system with many moving parts and multiple contributors. Cursor removes the syntax barrier. It does not remove the judgment barrier, and that gap is exactly where experienced developers still add value.
Should You Compare Cursor to Other AI Code Editors Yet?
This Cursor AI tutorial deliberately avoided a feature-by-feature comparison until now. Not on day one. Comparing tools before you understand your own workflow means you are optimizing for a feature list instead of a real need. Once you have shipped two or three small projects in Cursor, our side-by-side comparison of Cursor, Windsurf, and GitHub Copilot will mean a lot more, because you will finally know which limitations actually affect you.
If you want to see where this workflow goes once projects get bigger and involve real handoffs between people and AI, our guide to agent workflows for developers covers the next stage.
Frequently Asked Questions
This Cursor AI tutorial closes with the questions beginners ask most often once they have finished their first project.
Do I need to know HTML or JavaScript before starting this Cursor AI tutorial?
No. You need to be able to describe what you want in plain language and read an error message closely enough to paste it back into chat. The code itself is Cursor’s job in the beginning; understanding roughly what it did becomes your job as you go, which is the whole premise this Cursor AI tutorial is built on.
Is my code private when I use Cursor?
Cursor offers a privacy mode, available in settings, that prevents your code from being used to train models by Cursor or its model providers. Check the current setting before working on anything sensitive, and confirm the details on Cursor’s official documentation.
Does Cursor work without an internet connection?
No. Every AI feature, including Tab, Chat, and Agent mode, sends requests to a model over the internet. The editor itself may open offline, but the features this Cursor AI tutorial covers all require a connection.
What happens if I run out of free Hobby usage mid-project?
Cursor will limit further Agent requests and Tab completions until your monthly allowance resets or you upgrade. For a single first project completed in one or two sittings, most beginners do not hit this limit.
Can I use a project I built in Cursor for freelance or job work?
Yes, with the same caveat that applies to any code you did not fully write yourself: review it, understand what it does, and be prepared to explain and fix it without the AI if a client or employer asks. That is exactly the judgment skill Step 7 of this Cursor AI tutorial is meant to build.
Which AI model should a beginner pick inside Cursor?
Leave the default selection in place for your first project. Cursor’s default balances cost and quality for typical tasks, and switching models before you have a specific complaint, slow responses, or a task the default handles poorly, adds a decision you do not need yet.
The One Habit That Decides Whether This Sticks
The beginners who keep using Cursor past week one are not the ones who write the cleverest prompts. They are the ones who run their project after every change and read the errors instead of skipping past them. That single habit, verify before you move on, is worth more than memorizing every keyboard shortcut in this Cursor AI tutorial.
This Cursor AI tutorial only works if you actually open the editor today. Your next step: open Cursor today, create one folder, and finish one small project this week.
Do not wait until you have a “real” idea, and do not wait until you have read a comparison of every AI code editor on the market. The workflow you build on a throwaway project, describe clearly, run often, read the errors, is the same one you will use on everything you build after it.